Chevy Impala SS Forum banner

Another LS Swap LQ4 4L80e

1 reading
21K views 57 replies 10 participants last post by  KoolAidMan  
#1 · (Edited)
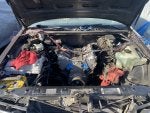
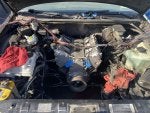
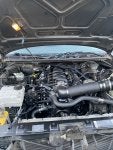
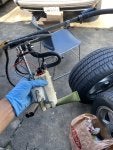
So I just started my swap about 2 weeks ago and thought I’d share my progress for anyone that is interested. Basically done at this point, just need to head to exhaust shop and test drive the tranny a little more. But for anyone wondering how I did it and what you need:

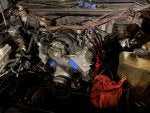
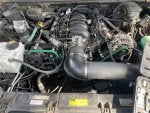
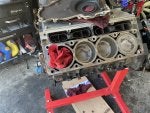
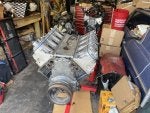
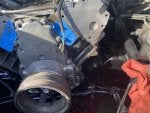
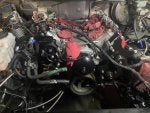
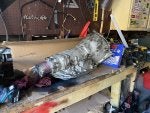
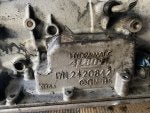
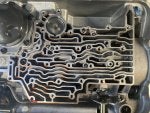
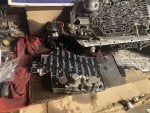
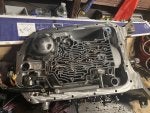
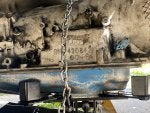
Drivetrain: 2000 6.0 LQ4 with 4L80e pulled out of a junkyard GMC Sierra 2500 myself
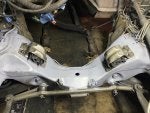
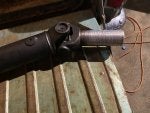
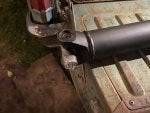
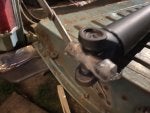
198033


198034


Engine mounts:
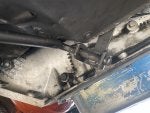
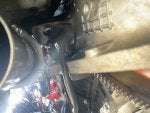
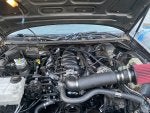
Used KDS mounts and motor fit nice. Does sit close to firewall but not a big issue. You can slide them a bit and I did have the motor all the way back, but start at the middle. Replaced the stock motor mounts while I was there using anchor 2292 on both sides. Just make sure you have the correct orientation for the top and bottom because you do not want to have to take off the motor mounts over a simple mistake. And I was able to remove the mounts by MYSELF without having to drop the control arm. Just make sure you have a good swivel and flexible wrench and you can do it. Just take your time. And make sure to primer under the mount too before you put them on, if you are painting your frame.
 

Attachments

#2 ·
Oil Pan

Used LS1 Camaro f body pan and it fit perfect with the KDS mounts. Clearance was good all around and nothing hit. Keep in mind when you bolt the engine in without the trans connected, the motor will lean back and your pan will be touching the k member until you bolt up the trans. For the low oil level sensor, the stock LT1 sensor threads right in or you can just buy a plug for $10 like I did. Gives it a cleaner look
 

Attachments

  • Like
Reactions: AZIMPALA
#3 · (Edited)
Fuel System

Now I used the stock sending unit and just replaced the pump with a higher flowing one than stock. I personally prefer in-tank pump setup but the choice is yours. Used a Kemso 10912 pump off eBay. Don’t let the price fool you. These pumps are cheap and reliable. I used PTFE braided lines that way I wouldn’t have any vapor smell, like you usually get with regular braided lines. If you use these lines, make sure not to cross thread your fittings onto the hose or it will leak! Trust me! Used a corvette fuel filter to regulate the fuel pressure and put it in the stock location. Used AN quick disconnect fittings at the rail, fuel filter, and gas tank feed and return. Makes everything so much simpler but make sure you get the threaded quick disconnect fittings and not the ones that clip on!
 

Attachments

#4 ·
Accessories

I kept the truck spacing so I could use the stock alternator and power steering pump that came with the engine. Used LSSimple brackets, and luckily he has a bracket for a stock HD6 A/C compressor. Wanted to keep stock compressor because of the way I wired up the A/C to the 0411 pcm. Everything fit perfect and has good clearance around the stock ABS and overflow tank. May need to bend brake line just a bit behind alternator though. For the power steering pump, I used a stock Impala return line that’s cut to fit and a stock 2001 Silverado pressure hose. Needs a little bending but everything bolts right in to steering box and fits nicely. With the A/C I was surprisingly able to use stock lines.
 

Attachments

#6 ·
Thanks! It’s a 65. Good eye.. will finish updating my post soon! Been busy finishing up this beast. As a matter of fact I’m At the exhaust shop right now waiting lol
 
  • Like
Reactions: 96Lt1civi
#7 ·
Transmission and Driveshaft

Transmissions are never fun to put in on the ground. That being said, this was my first 4L80e and let me tell you, it is very heavy! Before I installed the trans I put a Transgo shift kit, Sonnax line to lube valve, and plastic check balls. Highly recommend you install these parts at a minimum. Easier to do while transmission is out and on a bench. Luckily for me, the transmission was definitely rebuilt so I didn’t bother with a rebuild.. yet! Used Dans crossmember from ClearImage. Came with a poly mount and everything fit and bolted up nice with the KDS mounts. Had to make the bolt thru holes a little bigger on the frame, other than that, trans went in without any modifications to tunnel or anywhere else. I did have to cut the ear on the passenger side due to the headers I used, but I’ll get to that. If you are using AN fittings, make sure you get the correct ones for a 4L80e. There is a difference and you do not want to find out the hard way! Used a Lokar dipstick to make it easier to move as needed. Make sure to put some kind of sealant at trans! Bought the slip yoke new from GM and had a new driveshaft made for me. Used 1350 series U-joints and each end of the shaft but with a conversion U-joint at the rear end so it would bolt up to the stock pinion yoke. I Plan on changing out to a 1350 series pinion yoke when I do gear swap, and this way my driveshaft is ready to accept the bigger u joint later on. When measuring your shaft length, make sure the vehicle is on the ground!
 

Attachments

  • Like
Reactions: sherlock9c1
#8 ·
  • Like
Reactions: cappy p
#10 ·
Tried that but for some weird reason it Doesn’t fit. And the pump itself comes with some. Plus I already had that line in there from before so I just reused it since I was more concerned about soldering the wires and making a new harness to power the pump. Appreciate the tip though!
 
#11 ·
Great post. Thanks for making it. I am going to pop an LS in the wagon when it comes back from the body shop and your thread will be a help. The GMPP LS376/525. Out of curiosity, how much longer or shorter is the LS driveshaft than the LT? Also, how difficult was the re-pinning of the harness?
 
  • Like
Reactions: nsaness
#15 · (Edited)
Never said I thought it was easy, did I? I said the work is not something that keeps me awake.

Let's see... Been building cars for 35 years now. Including:
1. Stuffing a Caddy 472 with a narrowed 4.11 posi 12-bolt into a 1978 VW Rabbit sitting on a chopped and narrowed frame out of an old Buick Skylark
2. Putting the driveline from a 2003 BMW M3 (S54) into a 1995 BMW E34 station wagon, supercharging it, and then getting the 1995 BMW DME to handle running everything without converting to OBD2.
3. Transferring a Subaru boxer engine into a VW Beetle and converting the Beetle to water-cooling
4. Adding a turbo to a 1995 BMW M5 and making it daily-driver reliable.
...and about two dozen other project cars. I was also a professionally paid mechanic at both a higher-end German-specialty shop, and a domestic repair shop.

As I said before - an engine transplant is a non issue for me. I've got loads of time, tools, an inquisitive mind, and a healthy portion of know-how. Turning wrenches is not a concern I have. "Not a concern" =/= easy. It means I am not concerned about the effort it will require.

Didn't expect this thread to turn into a dick-length contest.
 
#16 ·
Let's see... Been building cars for 35 years now. Including:
1. Stuffing a Caddy 472 with a 4.11 posi into a 1978 VW Rabbit sitting on a chopped and narrowed frame out of an old Buick Skylark
2. Putting the driveline from a 2006 BMW M3 into a 1995 BMW E34 station wagon, supercharging it, and then getting the 1995 BMW DME to handle running everything without converting to OBD2
3. Transferring a Subaru boxer engine into a VW Beetle and converting the Beetle to water-cooling
...and about two dozen other project cars.

As I said before - an engine transplant is a non issue for me. I've got loads of time, tools, an inquisitive mind, and a healthy portion of know-how.

Didn't expect this thread to turn into a dick-length contest, but ok.
You got me all wrong.
I have no wiener to swing in this arena, but I sure was curious about your wording, "The work required is not a concern of mine".​
I don't know you, or your background at all.
I am in awe of people who can do mechanical work to this level. Some of your projects are unusual by my personal taste, but I respect the skill, knowledge, and experience needed to do that stuff. I am a tool and die maker by trade and while familiar with machining and "fits", I get lost on many simple automotive challenges. As I said, I can hardly get my LT1 in the place where it came from.
I sure would like to have you as a friend and neighbor! I could use your advice and supervision.
I really wanted to do an LS swap for my forced induction build, but I was pregnant with a fully built LT1 by the time LS swaps became common enough for me to tackle. I still regret not biting the bullet on an LS...
No harm meant, but I really wanted to know if you were that mechanically inclined, or if you were using a speed shop you trusted. If you were using a speed shop, I would have called to inquire about finishing my projects (y)
Mike Lonergan
 
#18 ·
@nsaness & @95wagon I apologize for boiling over and misinterpreting your intent. It's difficult to suss-out nuance over the interweb and I went in the wrong direction. I have lots of respect for anyone that's done the LS swap in these cars because it is not an easy thing. Thus my reply to the OP thanking him for the post. I'll be riding on the coat-tails of those that have already done this. I did not mean to trivialize anyone or any work that has gone before. @95wagon in particular, your work has been an inspiration of mine for some time now.
 
  • Like
Reactions: nsaness
#20 ·
Still have to post on the wiring. Sorry for the late response, but I was having an electrical gremlin myself and it was not fun chasing down. That being said, car is done! Runs nice and idles so smooth. Needs a tune to get the most out of it, but probably going to cam it first
 
#21 · (Edited)
Wiring

This can vary depending on your setup and what kind of harness you use, and if you decide to use some of the stock wiring, fuses, and relays. Lt1swap.com is your friend. Almost everything you need to know, regarding pin outs and wiring, is on that site. You honestly don’t need much from the stock PCM. I kept my A/C and got all the wiring info on that from the post on here from that one guy Jose. Also kept my ABS, and luckily all the wiring for that is separate from the PCM. I cut out all the wires I didn’t need from the stock connectors and separated what I did. Then I opened up the whole stock harness and pulled out all the unused wires. Wrapped up everything in cloth tape. Made a new harness for the fuel pump, since the new harness had its own fuel pump relay. I used the stock fan relays and wiring by using the signal wire off the stock PCM. I went with a new harness for the engine to keep it simple. Didn’t want to drill into firewall so I put the LS PCM in the stock location and fuse box not too far away from it. Could’ve done a better job at hiding all the wires, but I was in a rush to get it running. And to keep it simple for all you b body guys, this is what I used from the stock PCM. Keep in mind this is for a 95 so I don’t have a tach signal to save off the PCM:


Red connector

Pin 10 - sec fan DK BLU
Pin 11 - prim fan DK GRN
(Ground signals for relay)


Black connector

Pin 1 - A/C request signal DK BLU
Pin 8 - VSS speed
Pin 21 - A/C clutch status DK GRN


Clear/Gray connector

Pin 14 - brake switch PPL
Pin 15 - park neutral signal org/black (optional)


Blue connector

Pin 3 - PCM ign feed PNK
Pin 8 - A/C clutch control DK GRN/WHITE
Pin 9 - Check engine light
Pin 12 - A/C refrigerant pressure sensor RED/BLACK
 
#22 ·
Make sure you have good grounds! And gauges are tied in differently besides speed and tach. I used an adapter and the stock oil pressure sender to keep my stock gauge working. Volt meter is easy, fuel is tied into sending unit and separate from PCM, and temp is the only one I have to buy a sender for.
 

Attachments

  • Like
Reactions: nsaness
#23 ·
Adapter for LS motor and stock oil pressure gauge
198091
 
#26 ·
As above.
The one and only 376-525 I have "met" personally was on the dyno here ( rental just watching)
It sounded really cool and was somewhat lack luster in performance.
The calibration in the matching GMPP E67 controller was a bit of a joke.
There were "glitches " in tables that were in my calibration 10 years prior.
Also, If you did go E67 , you likely will have a little uphill battle with Cruise and AC control.
 
#27 ·
Here’s a little tip.. complain about the GM controller not working when you first get the engine, or if it’s still under warranty, and I bet GM will send you a terminator x system 🤭
 
#28 ·
Exhaust and shift linkage

I live in California and getting long tubes is not that easy, and what is available is pretty overpriced. So I went with some shorty headers that were recommended by a few people. Cheap eBay s10/universal headers. Just make sure you order the correct bolts to bolt up the headers though, because the ones that come in the box are standard not metric. Comes with exhaust flanges too.
198285


Headers fit well and Just had to trim the ear off on passenger side of trans for exhaust flange to fit. Driver side is pretty tight and had to bang body weld a little out the way. Flange was turned a little so it wouldn’t touch trans ear. Stock shift linkage barely clears header but it doesn’t touch.
198286


198287


198288


Nothing to difficult about the shift linkage. Removed the arm off the stock 4L60e and put it on the 4L80e. Then I just cut the shifter linkage a little at the end, so it wouldn’t hit the frame, and with a little effort I got it in. Had to bang heat shield a little to clear park but it still shifts good and feels like stock.

198289
 

Attachments

#29 ·
You might want to do a little google on O2 sensor placement.
Those are inviting condensation - moisture damage .
You could also bend that linkage frame bracket , and shorten the shaft so it can't touch the frame rail. Might be an illusion but it looks pretty close.
Of coarse , just my opinion
 
#30 ·
This was just a mock up before it got welded in. O2s were turned and facing different direction now. And shaft was cut at the end and bent a little to fit properly. Doesn’t touch Frame whatsoever. Actually shifts into gear better than it use to with the 4L60e. Pics don’t really do justice as seeing it in person. I appreciate your input though! Definitely can help someone who doesn’t know about any of that.
 
#31 ·
Had the PCM tuned last week and what a difference. This motor just wants to keep pulling up top, stock, where my old LT1 use to max out.. Shifts nice and firm too. Definitely doing gears and upgrading stall next. I’ll upload the vid or post the link once vid is up of my tune sesh. Includes a burnout or 2 😏
 
#32 ·
Haven’t posted on the A/C yet because I have not had the chance to charge it. Been dealing with another car this past week but once I do, I’ll post all the info on what it takes to get the A/C working like stock. I want to make sure everything works before I give any advice in that area. But in the meantime here’s some pics that weren’t already posted on some of my prep work. Changing out heads, oil pan, and all the gaskets and other little stuff that needs to be done.
 

Attachments

#33 ·
Don’t forget about the rear main seal and barbell! Don’t have any pics but I can assure you I definitely changed them. Those are a must!
 

Attachments

#34 ·
Excuse the language I was a little excited 😁
.. this was my 2nd or 3rd day driving it and you can see the problems that arose so quickly lol.. All good now though. A/C works just like stock too. Will write up on that soon enough, but honestly I got all my info on that from that one guy Jose who posted the info on a wiring harness LS swap.

 
  • Like
Reactions: nsaness