Chevy Impala SS Forum banner

Steering box fitting sizes???

15K views 73 replies 9 participants last post by  ocala  
#1 · (Edited)
I searched, I tried many different searches and read a lot of threads to no avail. One thread was on here where the guy added one of those tube coolers.

I did find a small amount of info about the style they are (inverted flare?) but not the size. Go figure.

I see pictures on rockauto of the end as well, and of course its the same style that go into the back of the PS pump.

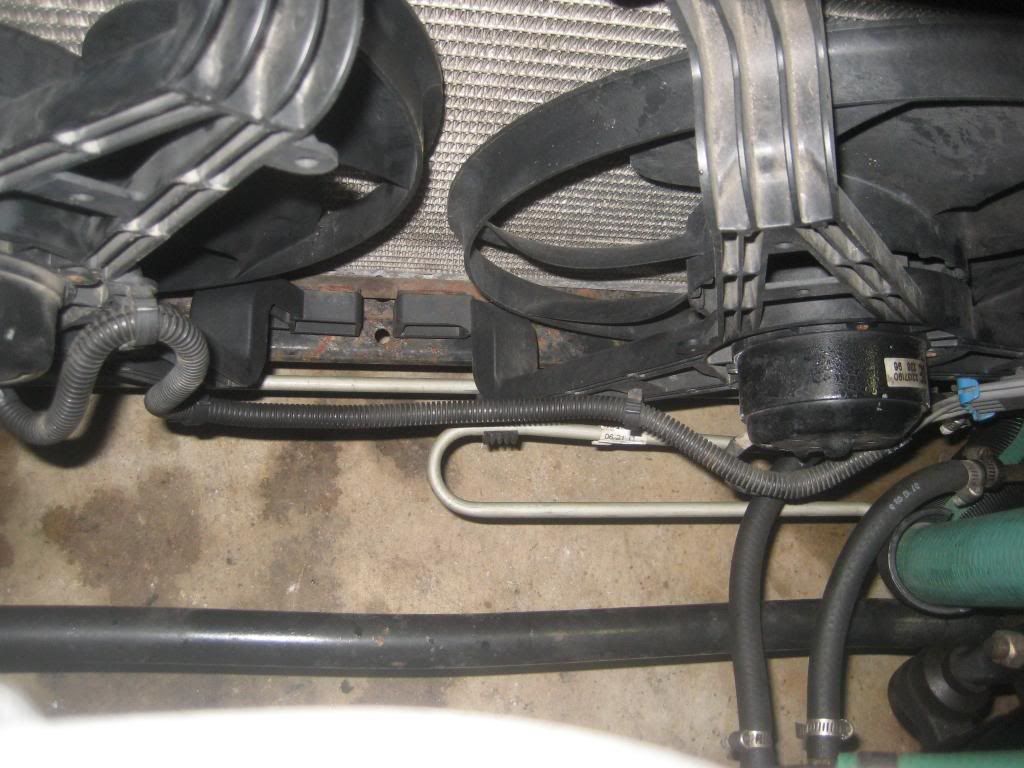
So I guess now my question changes mid post.. Can I just use an inverted flare fitting? or will I need to find a compression fitting to clamp on the hard line wherever I decide to cut it? What is the OD if I decide to go compression? I would look myself, but my car is at home and I would like to order this stuff now. Need to get a damn flaring tool really.

With this, I am trying to add a PS cooler to my system, since I overheat the living crap out of it!! Thanks dallas.
 
#2 ·
I guess you're talking about the fitting or nut size of the hose end? If so, I seem to remember they were in the 16 -19mm range but not certain as I have a set of flare wrenches and can't remember which was which. I looked up specs on the pressure hose and it shows the 2 sizes there for the fittings. Looks like the pressure hose is 16mm and 18mm on the other end

MasterPro Power Steering Hose 91780 - Power Steering Hose | O'Reilly Auto Parts

Keep in mind that these fittings are specialized and have an o-ring on them. If you want to convert over to something else, Russell and others carry these fittings to use.

It also sounds like you are considering cutting the line and going with compression fittings. I would not do this on the pressure side since the pressure will exceed the rating of that. You may be ok to do that on the return side though.

You can add a stock cooler made for the 9C1 (police package) cars. The return hose for this car is about $11 more than the standard return hose. I added this setup along with an inline filter and there is instructions on what you need to do this factory setup in I think the impalass technical archives.
 
#3 ·
You can only put the cooler on the return side. The OEM cooler line is just a piece of metal line. You could make a zigzag or coil the line yourself to give it more length for more cooling. Regular hose clamps will work fine, and you can make an unfinished double flare to act as a flange to keep the hose from slipping off.
 
#4 · (Edited)
The technical archives don't work for me. The site is there but the links don't work...

Yes, I wanted to add a cooler on the return side of course. I think I'll do it close to the same way I did my tranny cooler. I ordered a 12 by 7.5 inch derale cooler. It's fittings are 3/8 barb. I guess I'll just plumb that in with barb fittings and hose clamps.

Good to know that companies makes that goofy extended flare fitting that goes in and out of the steering box. I boiled the fluid the other day in traffic so this has become a big rush thing to get this done now. I wanted to do one before but I was going to wait....

Also I was asking for the fitting size. So thread diameter, not nut size. But thanks anyway! Still good to know!

Sent from my SM-N910V using Tapatalk
 
#5 · (Edited)
That Derale cooler sounds nice, post up some pics when you get it done. :nerd:


Here is the 9C1 Cooler/Return hose from AZ for only $30 and fit just like GM....the standard return line for the Impala is about $20.


Image


It just Zig-Zags along the bottom of the Rad Support and back to the Reservoir.


Here is the CUTnPASTE of the 9C1 Cooler Mod from Goldsswagon.com site....


Installing the SEO Power Steering Cooler


Advantages

Keeps the power steering fluid cooler than the just the stock unit, which is a good thing, especially if you autocross you beast.

Disadvantages

Additional hose routing needed, blocks some flow to the radiator.

Parts Required:


  • 1 Pipe Assembly, (GM P/N 26036034), $???
  • 2 Clamp-Lo (GM P/N 2091638), $???
  • 10 pack of bolts, (GM P/N 11509363), $???
  • 2 Nut, RR BP, (GM P/N 12337917), $???
  • 32 oz of GM Power Steering Fluid
Total cost is around $50.

Tools Needed:


  • 10mm wrench
  • 8mm wrench
  • Floor Jack
  • Creeper or something else to lay on underneath the car
Procedure (from Basim Jaber):


  1. Park the car, place blocks at rear tires, and set the parking brake.
  2. Siphon, pump, or drain the power steering fluid from the reservoir.
  3. Detach the reservoir from the bracket (it slides up), and detach the fluid line from the reservoir. This is the one closest to the front of the car. Save all of the protective sheething for reuse later!
  4. Tape up the end of fluid reservoir line to avoid spillage
  5. Jack up car and remove the clips that hold the two power steering lines. Tthey are under the motor along the frame cross member.
  6. Slide the plastic steering shaft cover off of the power steering fitting and unhook the two fittings from the power steering gear. Beware: this is a knucklebuster job! Use an 18mm wrench here, and watch out for draining fluid. Unhook the forward one first.
  7. Remove the power steering line in question that is to be replaced with SEO 7L9 tube assembly.
  8. Insert the tube assembly. The RH side goes under the coolant hose, and the LH side goes underneath (or possibly between, if it will fit) the oil cooler lines. Getting the RH side underneath the coolant hose will be snug, so hang in there.
  9. Hook up the cooler hose line to the reservoir using the stock clamp, and slide the reservoir back onto the bracket.
  10. Install the screws that hold the tube to the radiator frame housing using a 10mm wrench. Tighten them later, after fitting everything else, especially the cooler fitting to the power steering gear.
  11. Install the SEO cooler fitting to the power steering gear and tighten well. Note that if you take off the left wheel, there's more clearance to get a wrench in there from the side.
  12. Slide the plastic shaft cover back over the fitting.
  13. Install the stock inflow line back into the power steering gear and tighten well.
  14. Fill the reservoir with new fluid. Fill until the "C" mark (full cold) on reservoir cap is reached.
  15. With cap off reservoir, turn the wheels lock to lock 40 times.
  16. Lower car to ground, and check that fluid level is still at "C". Add if necessary
  17. Start the car, and turn the wheels lock to lock for two minutes.
  18. Check the fluid again, and add as necessary.
  19. Replace the fluid reservoir cap.
The hardest part of this mod is disconnecting/connecting the fittings to the p/s gear unit. There isn't much hand room and the wrench can only turn about a 1/8th of a turn in either direction. Consult the service manual for the standard precautions and more information on this mod.

A few pics of my install and the little Filter I spliced in near the Battery before going back to the Reservoir...

Image


Image
 
  • Like
Reactions: smelonas
#6 ·
Nice! Sweet. I saw your post as I was searching, pretty nice little setup!

Yeah I'm going to go for real on this cooler. Thought of doing a 2 or 4 pass one, but I thought to myself, well I'm going to be in it this far... lol it will look exactly like my tranny cooler.

Here's my plan, take the metal return line at the gear and cut it, add compression and barb fitting. Route 3/8 hose around rad to top inlet of cooler. Then go straight from cooler to reservoir. That last step will probably occupy an hour of my time. I need to make sure it is routed as smoothly as possible to allow 3 gallons per minute of flow.

There can be no backpressure. That's what Steve over at LEEs told me.

Sent from my SM-N910V using Tapatalk
 
#9 ·
Are you mounting the cooler up next to the stock ext tranny cooler where the stock engine oil cooler goes? I've also seen someone had a finned tubular style cooler they ran the length of the rad support.

If I was putting the cooler up front and wasn't going AN and braided, compression fittings would be the next best thing like your considering. Rather than running rubber hose through the rad support and back o the reservoir, I may try to run some steel line that you could bend up. Then cover that line with rubber hose where it passes through tight areas. You could probably get real tight to the frame and keep the line more secured than rubber hose. Maybe even borrow some items/ideas from the 9c1 setup.

I borrowed my buddies flare wrench set to do my PS pump. I think they were 5/8 or 11/16. Came right loose.

Have you guys tried putting Kroil or PB on those bolts at the gear a long time before you planned on taking it apart? I sprayed the cooler fittings on my radiator with that stuff a month before I planned on replacing it. They literally came right off. Where as before I sprayed them, I tested how easily they would come off and they would not budge.

Try putting that stuff on a few weeks before. It should really get in there and those fittings should just pop right off.

Sent from my SM-N910V using Tapatalk
Use PB Blaseter myself and good idea to soak them fittings for days. A lot of the "stickiness" of the fitting is it gets fused to the metal line and can often twist the metal line as you back out the fitting. I like to get as close as I can to the back of the fitting and the steel line with emery cloth and clean the fitting/metal line of rust and crud. Then before backing off the fitting, try to give it a little tighten first to break the seal.
 
#7 ·
OP, As an FYI I have both of these lines new in the bag in the trunk of my car.

I was going to replace them when I installed my rebuilt P/S pump, but I could not break the fittings loose on the gear box at all.

So I decided that will be a future project when I have some room to play around when I install the rebuilt engine I have in storage.

If you want any pictures or details, let me know.

The size of the hex fitting in the gearbox was 16MM, I don't recall if it was 18 or 16 on the back of the pump, but I'm leaning toward 16.
 
#8 · (Edited)
I borrowed my buddies flare wrench set to do my PS pump. I think they were 5/8 or 11/16. Came right loose.

Have you guys tried putting Kroil or PB on those bolts at the gear a long time before you planned on taking it apart? I sprayed the cooler fittings on my radiator with that stuff a month before I planned on replacing it. They literally came right off. Where as before I sprayed them, I tested how easily they would come off and they would not budge.

Try putting that stuff on a few weeks before. It should really get in there and those fittings should just pop right off.

Sent from my SM-N910V using Tapatalk
 
#10 ·
Yes! Tighten to loosen has always been a lost forgotten trick. Dumbest sounding thing ever, but it works as a last resort.

If you look at my post for my tranny cooler, it will literally be a mirror of that. So basically any airflow going through the grille will have to pass through one of the two coolers lol. Or go underneath them... either way. I'll just snake the line around the radiator support like the stock steel tranny lines and them go from there.

Should be extremely effective and easy to do. I need this fluid to stay cold. If I could keep it at 80 degrees, I would. Not being able to use synthetic really blows this whole system up ya know?

Sent from my SM-N910V using Tapatalk
 
#11 ·
So, quick update for anyone reading along.. I went out and looked at the lines and their configuration. It seems to me that this might be a little tricky, but certainly doable.

The only tricky part being the part where I have to figure out how to make space for the fittings and where to cut the metal part of the return line at the gearbox.

Cutting the line when it is headed toward the rear of Betsy is NOT an option, way to complicated getting the routing correct. So Ill have to cut the metal line on the downward part of the line. No problem, but there is probably going to be some bending involved here.
Question time; Can those lines be bent with utmost care and still maintain rigidity?
I know pressure is few and far between on the return line, but anything like hairline crack or pinhole is going to cause a problem! I assume there will be no problems..

I was also planning on running the post-cooler line, properly wrapped, ziptied to the frames of the cooling fans to the passenger side of the vehicle where the line will make a gentle arc to follow the frame then straight up to the reservoir. Thats the best way I SEE to reduce the chance of the dreaded backpressure which would ensure shortly followed certain death to my pitman arm seal, which already is slightly damp...

On that topic, does anyone use lucas oil in these systems? I know that MIAB just swells the seals, just like synthetic, but is it safe unlike synthetic? I know I should just have LEE rebuild the damn box. Or do it myself as I have the service manuals.

Anyway, thanks for your literacy nonetheless. Any input or advice is appreciated!
 
#21 ·
Question time; Can those lines be bent with utmost care and still maintain rigidity?
I know pressure is few and far between on the return line, but anything like hairline crack or pinhole is going to cause a problem! I assume there will be no problems..

!
you can bend them some by hand if careful but to much they can "kink"

You want to run the return line through cooler then back up to reservoir.

The GM 9C1 cooler line is just a 2 bend solid line....IDK how much it lowers temps. A true "cooler" IMHO would do a better job of cooling the PS fluid

For me I just plumed in my tranny cooler to PS when I did the T56. It is 3/8 line so I just bought a 4' piece of hard line with fittings at each end at NAPA and used my Harbor Freight tube bender to make my lines (pic). I did a coat hanger template first.

I did use a new stock return line as is to plum in (used clamps) to the "in" of the hard cooler lines I made and then a short new piece of PS fluid compatible hose from my hard line back up to reservoir

What ever cooler and mounting location you choose you can either use rubber hose all the way or bu and bend hard line for the in/out of cooler connecting to rubber in/out lines from return line and to reservoir.

I also bought a new high pressure line and the reservoir to pump fill hose
 

Attachments

#12 · (Edited)
Obviously you have spent some good money on the Lee box and with the cooler you chose will do something custom. If money is not part of the equation and you truly want to do this right and reduce back pressure, I would try to keep the bends to a minimum and open up the size of the lines.

Your best bet may be to go with some AN fittings and use larger than stock lines but you may still "bottleneck" at the reservoir fitting unless you enlarge that opening or replace it with something else. If you checkout page 16 of the Russell catalog, you'll see the hose fittings I mentioned earlier.

Russell Performance Catalog - Edelbrock, LLC.

Might fit your needs better if you don't mind the additional cost.


BTW - you may want to reach out to Lee (if you haven't already) and get their input based on what you're thinking, the cooler you chose and the car it will be installed on. I would think they could give you some more specifics.
 
#13 · (Edited)
I had a good 30 minute conversation with Steve at LEEs, and he said to use a cooler that is a six-pass cooler. Perfect, I already knew what to do there!

He said to just make sure that you don't go any smaller than 3/8 on any diameter at any time. That is the stock ID of the lines as you may already know.

So the cooler has inlets and outlets of 3/8 but the actual cooling tubes are about 1/2 or 5/8.

Also remember that the 9C1 had a cooler, two-pass if I remember right, and those never had issues. I think it's fine. According to Steve it should work out real well..

Like I said previously though, I am going to have the fluid go from the top down on the cooler. That should make gravity do a little bit of the work instead of the other way around.

My cooler will be here Tuesday and today the teardown begins. I have to assess the parts I need and go from there!

And one more thing, I won't be putting the cooler at the top of the condenser like I did with the tranny. That's fine in a situation like the tranny cooler, but in this case I want to maintain adequate COOL airflow across the condenser and radiator, so I'll probably have just a couple tubes exposed to direct airflow and the other ones will be below the bumper line.

Image

It will be like this except down 6 inches or so...
Sent from my SM-N910V using Tapatalk
 
#14 ·
I'll take a picture today and sketch up what I have in mind..

Sent from my SM-N910V using Tapatalk
 
#15 ·
Actually the inlet should be the bottom port to give air a far easier path out of any fluid cooling system...
 
#16 ·
The other potential problem with coolers of this type is actually chilling the power steering fluid too much in cool,to cold weather. I experienced this,and it can be quite concerning to suddenly have weak,or no power assisted steering when need to make a sudden sharp turn after driving down a fairly straight road in cold weather. I installed a fluid thermostat to allow fluid to bypass cooler at cooler temps. Solved the problem immediately.

Image


Image
 
#17 ·
I thought about the bleeding thing.. might be tricky. I'm unsure how I really want to do this honestly. Might just say to hell with it and just run it regularly.

Vegas doesn't get cold thankfully! And I'm genuinely surprised how much heat is created in the system at idle. Just sitting. I checked fluid cold with the car off, cool fluid. Ran for 5 minutes just idling, it got warm. Not hot, but it had a good amount of heat and that surprised me..

Sent from my SM-N910V using Tapatalk
 
#18 ·
Hey, dumb question but I just want to be sure, can someone measure the OD of the metal tubing for the return line? Right where it attaches to the gear? I don't have a set of calipers. And I don't have string to get a circumference measurement...

Sent from my SM-N910V using Tapatalk
 
#23 ·
Damn, not even a piece of string and I thought I had it ruff. :laugh: Seriously, a piece of paper would work in the same way. But using a wrench works too.


Good idea to hold off on any major mods before taking a long drive.
 
#19 ·
Try using a box end wrench to check. Believe it's 3/8",or AN-06
 
#20 ·
That's what I thought. Totally forgot I have a frikin crescent wrench. Jesus. Thanks!

Sent from my SM-N910V using Tapatalk
 
#22 ·
Okay okay. I got the plan together, but I decided that I won't be able to bash this thing together in time for my trip this Wednesday. Leaving town and going out to west Texas, so it needs to be rock solid reliable and without testing around town I just won't trust it. Given my experience with my tranny cooler line when I was on a trip..

Anyway. I'll try to put together a nice write up like I did for my tranny cooler. Lots of pics and all that, yes. Won't be any cool AN fittings this time though.

Bleh. Sorry for any dumb panic questions that may have had you scratching your head why. I was blocked up thinking I could make this happen before the trip.

Also, on that 9C1 cooler, I thought they got an actual tube and fin cooler, but I guess that was wrong! I see the line you guys are talking about. Kind of a mickey mouse ass setup GM came up with there.

Sent from my SM-N910V using Tapatalk
 
#24 ·
Well, we are taking the lady's bmw. I ran it through my head a 100 times. If everything went perfectly, and in my world it never does, I could just barely get it done before we had to leave. I just couldn't make myself do that in all honesty. My damn near perfect work has failed before and it will fail again. At least if it goes pop in Dallas, geico will tow me home free lol.

Yeah. I thought of paper, wire, and all that after the fact, I just was so clogged up in my head I couldn't even do 1 plus 1. And no I don't have string. I'm moving soon so I am trying to get rid of everything or not buy any true non essentials. Funny how I have had a whole new front end for my car in my possession for almost a year, but haven't even put forth an ounce of effort to install it and won't buy string for 'reasons'. #winterprojects.

I'm done ranting for now. I'll just go back into my hole in the ground.

Sent from my SM-N910V using Tapatalk
 
#25 ·
If you're still interested in an O.D. measurement of the tubing, I can get you that once I get home today.
 
#26 ·
I got it! Thanks though! I used my crescent wrench. And my head, to everyone's surprise. Lol

Sent from my SM-N910V using Tapatalk
 
#27 ·
Image
Image


Got cooling mo'effer?!?!?!

Sent from my SM-N910V using Tapatalk
 
#28 ·
Here are a couple quick sketches of my idea of what is going to go down. Thankfully, it was dark out so the pictures are total crap. I just sketched in the return line after the cooler. As for the line before the cooler, well that's for after project completion.

Image
Image


I will snake the lines around the radiator tray frame, and then across the electric fan supports then snake up to the reservoir in a OEM looking fashion.

Sent from my SM-N910V using Tapatalk
 
#32 · (Edited)
In between nothing and huge would be a GM truck cooler.

When mine was an LT1, I spliced a truck cooler into a SEO cooler line
That's interesting. Curious, where/how ( vertical in between fans?? ) did you mount the cooler...any pics? 0:)

Edit - btw...what cooler is that and what truck is that from?